Command-line shells
These terms are used loosely and are not reflective of their technical meaning. If I said to you this course teaches Windows, for example, for most, something comes to mind. However, technically, Windows could be Windows 95,98,3.1, ME, XP, and so forth. Same here – just more extreme. Learning command-line is generally the same as learning BASH (the most common shell environment), and the same as learning to use Linux/Unix computers for most beginners. Down the road, there are important distinctions, so to keep all of this accessible to new users, we will not go down these rabbit holes.
Command-line shells are started up from a terminal program. Every Mac computer has Terminal preloaded. Start that up and you’ll see a prompt from the shell. The shell is actually a program that responds to you, and you can change its look and feel. Most people like the shell that is called bash. With Catalina, there is a recommendation of using zsh. However, 15 years ago, tcsh was more common. There are others like c-shell (csh) and ksh.
Bash is pretty handy in that things like up-arrow take you to the previous command, and you can press ‘tab’ to autocomplete. Now the important thing is that when bash starts .bash_profile is executed for login shells, while .bashrc is executed for interactive non-login shells. We can store a lot of settings here. Settings for the shell are also called environmental variables. You can see some examples such as typing echo $HOME' where echo simply prints the variable. $PATH is really important because to run any program, you need to know its location’s path.
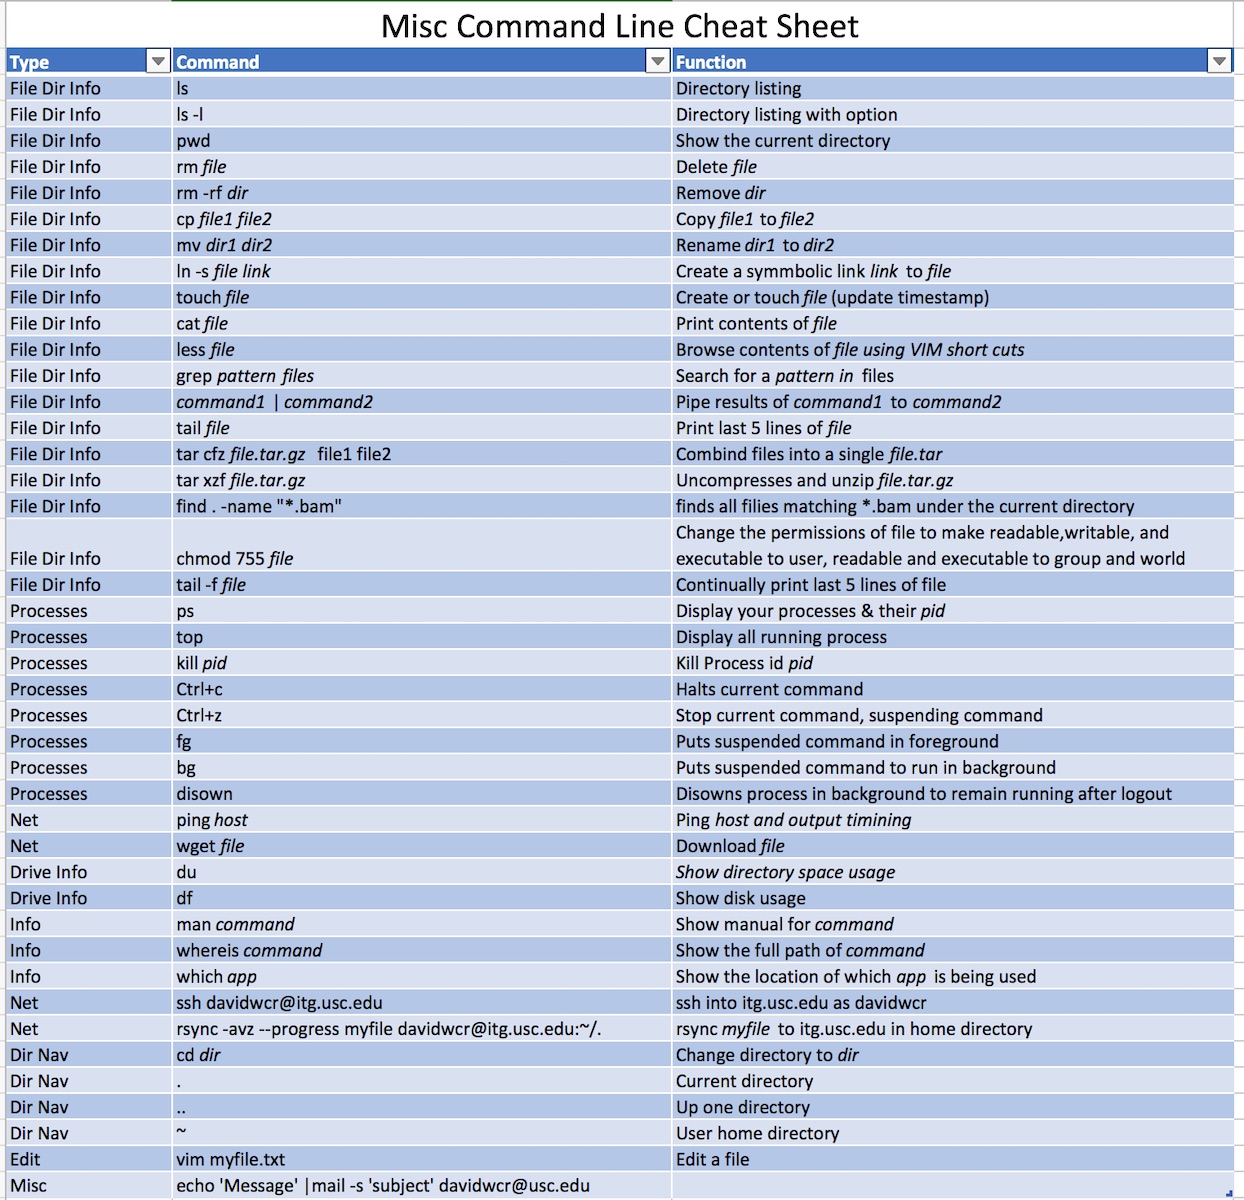
There are many different resources for learning command-line on Linux/Unix-based systems. Typically, a user may need to know 20 to 40 commands, with cd, ls, less being common. We have provided a cheat sheet below, and we link to some provided by others. All of the commands have lots of options, and one can learn about them by typing ‘man [command]’, ( ‘man grep‘ for example). However, most people just google Linux command options. It is important to know that there are thousands of Linux commands, but most people only remember a small subset specific to their field. Some example resources are:
- https://learncodethehardway.org/unix/bash_cheat_sheet.pdf
- https://files.fosswire.com/2007/08/fwunixref.pdf
- https://www.cheatography.com/davechild/cheat-sheets/linux-command-line/
In the examples below, I’m presuming access to a Jupyter server via a terminal. You can access a Jupyter notebook here: https://jupyter.org/try

I’m using this since its an easy way for anyone to get access to a BASH terminal – whether on a chrome book, windows, or macOS. You should note that the examples below will be different than the starting point for you – however, the examples should be building points nonetheless. In this class, I expect you to use the TRGN server via ssh.
Part A: Navigating and commands
This section reviews some of the basic commands for moving around directories, changing filenames, copying, and so forth.
Understanding and navigating directories
The first question someone might ask is when they start a terminal? Where am I – that is, what is the working directory the terminal in? We figure that out with pwd (which is short for print working directory).
$ pwd

/home/jovyan/mydir
How do we change the working directory? First to go up a directory, and then list the contents, including permissions.
pwd
ls
mkdir mydir
cd ~/mydir
Change to a directory in the users home directory
Basics: Moving around in directories
These are the basic commands needed to move around in directories.
 pwd        # Get full path of the present working directory (same as "echo $HOME")
 ls         # Content of pwd
 ls -l      # Similar as ls, but provides additional info on files and directories
 ls -a      # Includes hidden files (.name) as well
 ls -R      # Lists subdirectories recursively
 ls -t      # Lists files in chronological ordercd
 cd         # Brings you to the highest level of your home directory.
 cd ..      # Moves one directory up
 cd ../../  # Moves two directories up (and so on)
 cd -       # Go back to you were previously (before the last directory change)
 cd ~       # Go to home directory
Making files, Deleting files, Moving Files
mkdir dir_name # Creates specified directory
rmdir dir_name   # Removes empty directory
rm file_name     # Removes file name
rm -r dir_name   # Removes directory including its content, but asks for confirmation,'f' argument turns confirmation off
cp name path  # Copy file/directory as specified in path (-r to include content in directories)
mv old_name new_name # Renames directories or files
Special Characters: Wildcards (*), Tildas (~), and periods (..,.)
One important concept is the * wildcard character. It basically means anything including the characters surrounding it. Thus ls m* would list all files start with m. We could type ls *ls* to get a listing of all files that have the characters “ls” in them. It’s handy for finding types of scripts, such as all python scripts, which by convention end in .py, so we would type ls *.py.
Tilda or ~ is the next key character to remember. It is shorthand for your home directory or path. We’ll use directory and path interchangeably at times. Thus to cd ~ takes you to your home directory.
Two periods, or .. refers to the parent directory of your current directory. For example, cd .. moves up a directory.
One period, or ., is shorthand for your current directory. For example cp ~/demo/jupyterlab-slides.pdf . copies jupyterlabs-slides.pdf into the current directory.
Part B. Core Unix-based commands
Shown below are some common Unix-based command-line commands that are frequently used. Remember, if you are trying to do something and you don’t know how, you can always use Google and there will be more than one helpful resource. Also, at the bottom are several that I find useful within my cheatsheet. In the beginning, we provided you with some other cheatsheets made by others.
Don’t memorize every command; Yes, you need ls cd and 3 or 4 others. I put the main ones I use at the end.
Finding files, directories, and applications
find -name "*pattern*"            # searches for *pattern* in and below current directory
find /usr/local -name "*blast*"   # finds file names *blast* in specfied directory
find /usr/local -iname "*blast*"  # same as above, but case insensitive
find ~ -type f -mtime -2   # finds all files you have modified in the last two days
which <application_name>   # location of application
whereis <application_name> # searches for executeables in set of directories
grep pattern file           # provides lines in 'file' where pattern 'appears',
grep 'pattern' file | wc    # pipes lines with pattern into word count wc
List directories and files
ls -al   # shows something like this for each file/dir: drwxrwxrwx
          # d: directory
          # rwx: read write execute
          # first triplet: user permissions (u)
          # second triplet: group permissions (g)
          # third triplet: world permissions (o)
More useful commands
df             # disk space
free -g        # memory info in Megabytes
uname -a       # shows tech info about machine
bc             # command-line calculator (to exit type 'quit')
wget <ftp>     # file download from web
ln -s original_file new_file # creates symbolic link to file or directory
du -sh         # displays disk space usage of current directory
du -sh *       # displays disk space usage of individual files/directories
du -s * | sort -nr # shows disk space used by different directories/files sorted by size
Process Management
Viewing text files
more <my_file>  # views text, use space bar to browse, hit 'q' to exit
less <my_file>  # a more versatile text viewer than 'more', 'q' exits, 'G' end of text, 'g' beginning, '/' find forward, '?' find backwards
cat  <my_file>  # concatenates files and prints content to standard output
Running and managing processes
top               # view top consumers of memory and CPU (press 1 to see per-CPU statistics)
who               # Shows who is logged into system
w                 # Shows which users are logged into system and what they are doing
ps                # Shows processes running by user
ps -e             # Shows all processes on system; try also '-a' and '-x' arguments
ps aux | grep <user_name> # Shows all processes of one user
ps ax --tree      # Shows the child-parent hierarchy of all processes
ps -o %t -p <pid> # Shows how long a particular process was running. # (E.g. 6-04:30:50 means 6 days 4 hours ...)
Ctrl z <enter>    # Suspend (put to sleep) a process
fg                # Resume (wake up) a suspended process and brings it into foreground
bg                # Resume (wake up) a suspended process but keeps it running in the background.
Ctrl c            # Kills the process that is currently running in the foreground
kill <process-ID> # Kills a specific process
kill -9 <process-ID> # NOTICE: "kill -9" is a very violent approach. It does not give the process any time to perform cleanup procedures.
kill -l           # List all of the signals that can be sent to a proccess
kill -s SIGSTOP <process-ID> # Suspend (put to sleep) a specific process
kill -s SIGCONT <process-ID> # Resume (wake up) a specific process
renice -n <priority_value> # Changes the priority value, which range from 1-19,the higher the value the lower the priority, default is 10.
Archiving
Dealing with archiving files is fundamental in bioinformatics. Most often files are zipped (compressed). If you want to put multiple files or directories into a single file, you use the program tar . It’s important to know that tar alone does not zip without the -z options. Here are a few approaches:
Creating
tar -cvf my_file.tar mydir/    # Builds tar archive of files or directories. For directories, execute command in parent directory. Don't use absolute path.
tar -czvf my_file.tgz mydir/   # Builds tar archive with compression of files or directories. For dirs, execute command in parent directory.
zip -r mydir.zip mydir/        # Command to archive a directory (here mydir) with zip.
tar -jcvf mydir.tar.bz2 mydir/ # Creates *.tar.bz2 archive
Viewing
tar -tvf my_file.tar
tar -tzvf my_file.tgz
Extracting
tar -xvf my_file.tar
tar -xzvf my_file.tgz
gunzip my_file.tar.gz # or unzip my_file.zip, uncompress my_file.Z,or bunzip2 for file.tar.bz2
find -name '*.zip' | xargs -n 1 unzip # this command usually works for unzipping many files that were compressed under Windows
tar -jxvf mydir.tar.bz2 # Extracts *.tar.bz2 archive
Key Commands
See below for a list of commands I use frequently. Everyone is different – and there are different approaches.
Part C: Paths and Settings
Directories and paths
Directories are something we’ve touched on, but its important to know that every file is within a directory. In Unix, these are separated by /. If we cd to the top level it would be cd /. The character ~ has a special meaning and it means the home directory. Typing cd ~ changes directory to our user’s home. you can do that followed by pwd figuring out your home directory.
We want to introduce our first important variable: the PATH variable. The PATH variable is basically a list of directories your computer looks through to find a requested executable. When we login, a series of bash commands (within the .BASHRC file) is automatically run, and typically one of these sets your PATH variable. Where is this file? Well all files that begin with a . are hidden by default and we need to type ls -a to see them:
.             binder   demo        .jupyter  .profile          .travis.yml
..            .cache   .empty      LICENSE   README.md         .yarn
appveyor.yml  .conda   .git        .local    talks.yml
.bash_logout  .config  .gitignore  mydir     tasks.py
.bashrc       data     .ipython    .npm      timestypedls.txt
The PATH the variable is very important, and so much so that we have a default. It’s the directory for a file. In fact it’s so important, we generally need to know the entire path of a program in order to run it. For example, let’s say the program ‘ls’ is stored in /usr/bin/ls. To run it, you’d have to type /usr/bin/ls. However if add /usr/local/bin to our path, then we only have to type ls. We can have a lot of things in our path, and then separate them by colons. If you like, type echo $PATH to see what’s in your current path. All of your favorite startup settings are in your .bashrc file. In some cases, a default setup is only calling up .bash_profile. Here, people usually have only one command in it – that is to source .bashrc.
There are some conventions. The bin the directory is typically where you put executable programs. So the first good thing to do is to create a bin in your home directory. These are often called local executable files. To actually make the bin meaningful, you’d have to add it to your path, such as PATH=$PATH:~/bin, would add that local bin to your existing path. There are going to some programs installed as superuser or root (who can read and write anywhere. These are typically in /usr/bin. The directory /etc is where settings are – and don’t go here unless you know what you are doing. Don’t worry – you shouldn’t be able to do anything without becoming superuser.
Part D Core Operations: Pipe | and Redirect >
Two of the most important features of Unix-based systems are the ability to manipulate when data is going to the screen, a program, or in another file. Specifically, we’ll discuss piping and redirecting. Piping is done using the | symbol and sends the output from what’s left of the pipe, to the program on the right of the pipe. Redirect > puts the output of the left into the file in the right. An example of a pipe that takes our history and pipes it to grep which only prints lines that match.

Piping and redirection is the means by which we may connect these streams between programs and files to direct data in interesting and useful ways. (see ryanstutorials.net
history | grep ls
An example of redirecting that output to a file
history > myhistory.txt
When we use >, then we are writing the output to the file, replacing all of the contents. We can also append to the file using >> instead:
echo “Created by John Doe” >> myhistory.txt
We can see that we appended “Created by John Doe” to the end of the file myhistory.txt using tail.
Part E: File permissions & chmod
Permissions are an important early concept – and you’ll need to have completed Part D. A simple explanation is that files can be readable(+4), writable(+2), and executable (+1) to yourself, your group, the world (that can login), and in that order. If something is read-only, it’s 4. If something is read and writable, its 6. If something is readable and executable it’s 5. A script needs to be executed, and thus it’s possible to make a script executable using the chmod command, with 7 for the user, 5 for the group, and 5 for the world.
Lets first get a script called myscript.sh using the Linux command wget that is provided at the wget https://trgn.bioinform.io/myscript.sh. As a note, the command wget is handy for scraping web-pages.
wget https://trgn.bioinform.io/myscript.sh
The script as we learn is simple and starts with a shebang line (#!/bin/bashrc) or declaration of what shell should run the following lines. You’ll see something like:
--2020-04-23 12:59:11-- https://trgn.usc.edu/site/myscript.sh
Resolving itg.usc.edu (dtg.usc.edu)... 128.125.215.226
Connecting to itg.usc.edu (dtg.usc.edu)|128.125.215.226|:443... connected.
We can view the file by using cat, more, or less, which are all ways of viewing files that are text-based. The program cattypes out the whole file, while lessallows you to press the space bar and slowly move through the file. Thus we type cat myscript.sh
#!/bin/bash
# declare STRING variablethe # creates a comment
STRING="Hello World"
#print variable on a screen
echo $STRING
echo "You are " + $USER + " This is a computer called" + $HOSTNAME
This will have put the script in your directory. But you cannot run it because it’s not executable. to see this type:
ls -l
We see
jovyan@jupyter-jupyterlab-2djupyterlab-2ddemo-2dz7wzm2in:~$ ls -l
total 44
-rw-r--r-- 1 jovyan jovyan 1323 Apr 22 04:17 appveyor.yml
drwxr-xr-x 1 jovyan jovyan 4096 Apr 22 04:17 binder
drwxr-xr-x 1 jovyan jovyan 4096 Apr 22 04:17 data
drwxr-xr-x 1 jovyan jovyan 4096 Apr 23 13:00 demo
-rw-r--r-- 1 jovyan jovyan 2653 Apr 22 04:17 LICENSE
-rw-r--r-- 1 jovyan root 100 Apr 23 12:54 myscript.sh
-rw-r--r-- 1 jovyan jovyan 3106 Apr 22 04:17 README.md
-rw-r--r-- 1 jovyan jovyan 2162 Apr 22 04:17 talks.yml
-rw-r--r-- 1 jovyan jovyan 6275 Apr 22 04:17 tasks.py
This gives the permissions as we will show. We now must make it executable.
Now lets change permission and run it:
chmod 755 myscript.sh
./myscript.sh
Hello World
You are  + david_w_craig +  & This is a computer called + test
You might notice that the above is slightly different then what you may have received. Why? You’ll see later in special variables.
You are user. A linux computer expects multiple users and they form the world of users. You can be assigned to a group or groups. Other users on the computer may be in your group, and there are some groups you don’t belong to.
Level 1: You the user, and your permissions. Perhaps your username is john_doe. If you want to be able to view a file, give yourself a point (+4). If you want to be able to write to a file or change a file, give yourself four points (+2). If you want to be run a file – such as a script as a program, give yourself a point. Want to do all 3? 4+2+1=7.
Level 2: Groups. Perhaps you belong to bioinformaticians. If Jane_doe is also a bioinformatician. Do you want Jane to execute a file? Well, she technically must be able to read it. So she needs 4 + 1 points = 5 points
Level 3: World. What about others on the computer? What if you don’t want others to be able to read or execute – they get 0 points.
Let’s look at an example. In your Jupyter notebook, type
ls -l
This asks to list the files in our current directory, showing all permissions, dates and so forth. My example is below:
total 1112
-rw-r--r-- 1 jovyan jovyan       8 Apr 15 06:28 apt.txt
-rw-r--r-- 1 jovyan jovyan     226 Apr 15 06:28 environment.yml
-rw-r--r-- 1 jovyan root   1116435 Apr 17 03:37 index.html
-rw-r--r-- 1 jovyan jovyan    4326 Apr 17 03:38 Index.ipynb
-rwxr-xr-x 1 jovyan root        19 Apr 17 03:35 myscript.sh
The last file can be run and is executable because of the x. In fact, we see that everyone on the computer can run it:
-rwxr-xr-x1 jovyan root 19 Apr 17 03:35 myscript.sh
What if I just want only myself to be able to run the file? I would chmod 700 myscript.sh and then it becomes
-rwxr-xr--1 jovyan root 19 Apr 17 03:35 myscript.sh
If you’d like to look at a few more examples, here is a webpage that goes into a little more detail. File Permissions
Now let’s change the permissions of our script to actually give us the ability to do all the things described above. The chmod command is used to change the permissions of a file:
chmod 755 script.sh
./script.sh

To see our new permissions, you may use the following command:
ls -l
This asks to list the files in our current directory, showing all permissions, dates, and so forth. My example is below:
![]()
To the left, we see permissions described by a series of letters. The ‘r’ stands for readability, the ‘w’ stands for writability, and the ‘x’ stands for executability. The letters are in groups of three in the series of User, Group, and World permissions.
Part F: Servers
Working on servers

Much of data science involves remotely logging into a computer. A remote computer intended for other individuals or computers to connect to through the internet is called a server. How do we fine the computer? It will typically have an internet protocol (IP Address: 35.225.22.109), and frequently it will have registered an official name such as datasciencebioinformatics.org, that points to this IP.
There are many ways servers can be reached. A server has ports that can be opened and allow people to access programs. The most common is HTTP and HTTPS, which are on ports 80 and 443. Its so common the port numbers are generally not even required, and typically one just needs to type HTTPS://datasciencebioinformatics.org. When you do, your computer contacts the domain name server (DNS) to learn the computer’s IP, and then requests data port 80 or 443. This port is typically controlled by web-server program, such as Apache, that responds to requests, such as HTTPS://datasciencebioinformatics.org/index.html and knows to retrieve text, scripts or the appropriate information. Your web-browser gets this as text and within your computer puts together the HTML it receives to create web-pages that have the familiar look and feel.
We can actually typically look at the instructions, termed HTML, by using view source in the menu of your web browser. In this course, we will utilize Google Chrome and it is recommended in general for accessing materials.

However, other ports are used for different types of connections. We are going to login to computers and run programs, manage them, and conduct complex analysis using command-line. As we will learn this involves using ssh to login to computers. Again, ssh is so common that typically you don’t need to specify its port, 22. These servers can often access other servers and have resources connected to them. There are a few critical concepts that determine if a computer or server is able to facilitate the task we need.
SSH stands for secure shell. It is used to run a server or network, securely. Often times, when working from your personal device, you will be asked to ssh to a remote server using the command line. This will allow for added security from the perspective of your company or team and the ability to share files easily amongst team members. You won’t be logging in to a server in this module. But, it is definitely useful to know for your future projects.
When you get on the network, you assigned an internet address. Most often we think IP4, and its a combo of 4 numbers that range from 1 to 255. There is a newer address system. For example, I can look at my internet address from my home computer. Typically, we just grab an address for the moment – almost like staying at a hotel. We can also have a fixed address – also called static. There are only so many numbers, so a lot of places that have people log-in and out like to give out the numbers that are being unused.
Numbers are hard to remember, so the internet became the internet standards in registering and looking up names came out. The map from IP addresses to names is provided by domain name servers. Basically these place your computer to find out what “www.cnn.com”‘s IP address is. As we can see in the news if you take these out the internet grinds to a halt. People have been taking these out by having a bunch of zombie machines makes lots of requests for them.
A server is just a computer you can login into using a protocol. The best way and the most common way we do this is by using a secure shell protocol or ssh. Thus I can login to a remote computer by opening the command-line shell,
ssh myname@trgn.usc.edu
Logging in to a Remote Server
To log in to a remote server, you would carry out the following steps:
- Open a terminal window
- Type in
ssh server_name - Change the default password using the
passwdcommand followed by your new password
Upon logging in, your prompt will change slightly to indicate your new username.
e.g. When I SSH to a server provided by USC, my username changes from ramiyasivakumar to ramiyapr. This reminds me of the server I’m using.
A useful command is the hostname command. This will print the name of the server you are on.
Copying files to and from servers
There are many ways to get files over to a server. Some are no longer used, and each server has its own rules that are set by the sysadmin. If you are using a MacOS, then it too can be a server, and you can open up the ability to open it up to the world. Some examples are telnet, scp, rsync, sftp, ftp and so forth. There are graphical tools which can aid in this process, but for now, we will ignore them. We will focus on rsync. We focus on rsync because scp only provides a cp like method to copy files from one machine to a remote machine over a secure SSH connection – and better, rsync,provides synchronization options to pick up where things left off. rsync allows you to synchronize remote folders.
To copy a folder from your local device to the server, the syntax would look something like this:
rsync -azvh myfolder server_name:~
In this example, I am copying a folder called myfolder, to a server called server_name
The -azvh is an option I’m using. To better understand what options are available, you can look at the rsync manual, by typing man rsync though many web pages provide easier to understand options.
In this section, we review some of the basic commands for moving around directories, changing filenames, copying, and so forth.
Part G: VIM
Being able to edit files from a terminal is an essential skill. There are a few tools, such as nano. We don’t teach nano here, since our goal is for you to be a legitimate data scientists. Generally, the tool of choice is either emacs or vim.
Exercise: Learning how to edit text with vim
Vim is an editor to create or edit a text file. There are two modes in vim. One is the command mode and another is the insert mode. In the command mode, the user can move around the file, delete text, etc, whereas in the insert mode, the user can insert text.
VIM Editor Commands
From command mode to insert mode type a/A/i/I/o/O ( see details below)
From insert mode to command mode type Esc (escape key)
Text Entry Commands (Used to start text entry)
aAppend text following the current cursor positionAAppend text to the end of the current lineiInsert text before the current cursor positionIInsert text at the beginning of the cursor lineoOpen up a new line following the current line and add text thereOOpen up a new line in front of the current line and add text there
The following commands are used only in the commands mode.
^F(CTRl F) Forward screenful^BBackward screenful^fOne page forward^bOne page backward^UUp half screenful^DDown half screenful$Move the cursor to the end of the current line0(zero) Move the cursor to the beginning of the current linewForward one wordbBackward one word
Exit Commands
:wqWrite file to disk and quit the editor:q!Quit (no warning):qQuit (a warning is printed if a modified file has not been saved)ZZSave workspace and quit the editor (same as :wq)
Text Deletion Commands
xDelete characterdwDelete word from cursor ondbDelete word backwardddDelete lined$Delete to end of lined^(d caret, not CTRL d) Delete to beginning of line
Yank (has most of the options of delete)– VI’s copy command
yyyank current liney$yank to end of the current line from cursorywyank from the cursor to end of the current word5yyank, for example, 5 lines
Paste (used after delete or yank to recover lines.)
ppaste below cursorPpaste above cursoruUndo last changeURestore lineJJoin next line down to the end of the current line
File Manipulation Commands
:wWrite workspace to original file:wfile Write workspace to named file.Repeat last commandrReplace one character at the cursor positionRBegin overstrike or replace mode � use ESC key to exit:g/pat1/s//pat2/greplace every occurrence of pattern1 (pat1) with pat2
Examples
Opening a New File
- Step 1 type
vim filename(create a file named filename) - Step 2 type
i( switch to insert mode) - Step 3 enter text (enter your Ada program)
- Step 4 hit
ESCkey (switch back to command mode) - Step 5 type
:wq(write file and exit vim)
Part H Exercise: Implementing BASH Practically
In this example, we are going to be using BASH to subset and extract information from a file that is publicly available, Homo_sapiens. We will explore the concepts of extracting information, piping information to a new file, amending this file and finally visualizing the output.
Retrieve some sample data, and unzip it
This data is a GTF (gene transfer format) file. It contains information about the gene structure, mapping all known genes and transcripts to build 37 of the human genome as defined by the Ensemble effort led out of the European Bioinformatics Institute. In this file, each line is a ‘feature’. You can see that an ‘exon’ is a feature, as are ‘gene’, ‘microRNA’, etc. Say we want to narrow the file down to only pull out the columns that contain “gene”. The following code aims to extract this information, along with the position of the gene, and store it in a new file.
The homo_sapiens file is a common reference file. You can learn more about the content here, and this is relevant for our efforts. http://ftp.ensembl.org/pub/release-75/gtf/homo_sapiens/README
wget http://ftp.ensembl.org/pub/release-75/gtf/homo_sapiens/Homo_sapiens.GRCh37.75.gtf.gz
Let’s unzip it
gunzip Homo_sapiens.GRCh37.75.gtf.gz
Let’s preview it
less is a program that allows us to browse a text file. Many people actually alias more=less in their .bashrc file. less is nice in that it allows and recognizes many vim commands such as ‘/search’. To make our app, we will want a comma delimited file that it has ‘feature’,’chr’,’start’,’stop’. There is clearly much more info here.
less Homo_sapiens.GRCh37.75.gtf
Note: to exit less, use the q quit command.
Let’s pull out a few fields
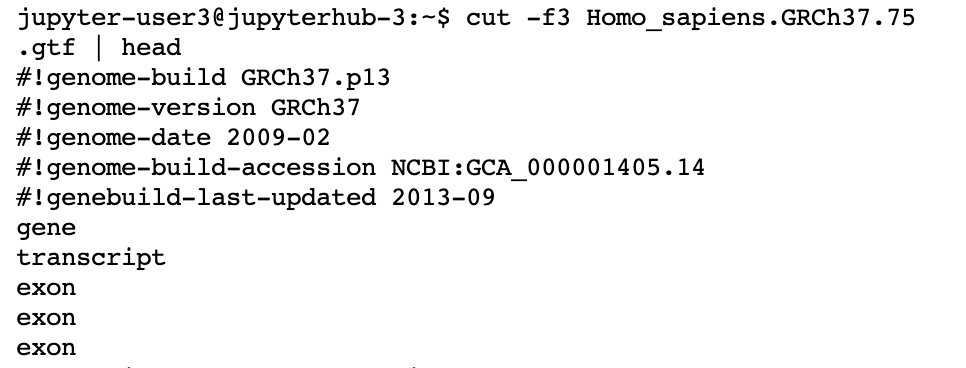
There are many ways to pull out a column and put it into a file. One program that can do this is ‘cut’, another is ‘awk’. Here we use cut just for the purposes of showing different approaches. We use -f3 which means to cut out the 3rd column presuming space delimiters. To see all of the options of cut, feel free to man cut.
cut -f3 Homo_sapiens.GRCh37.75.gtf | head
Output:
Let’s use awk instead for formatting
As we said, there are many ways to cut fields. awk ( gawk or nawk would work too, as they are different versions of awk) is one of the most common linux/unix/bash tools for wrangling data. In the example below, we print the 2nd, 1st, 4th, and 5th columns for those lines where the 3rd column matches gene . By default, it splits by white space, but you can change this if you need to.
awk '$3 ~ /gene/ { print $2,$1,$4,$5}' Homo_sapiens.GRCh37.75.gtf | head
Output:
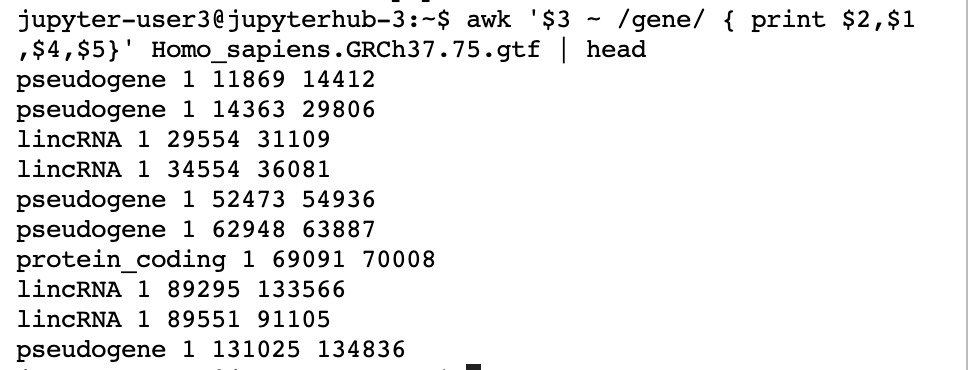
The $n refers to the nth field. The /text/ is how we match the lines we want to alter. In this case, if there is a “gene” in the 3rd column, we print some the $2, $1, $4, and $5 field for the file Homo_sapiens.GRCh37.75.gtf
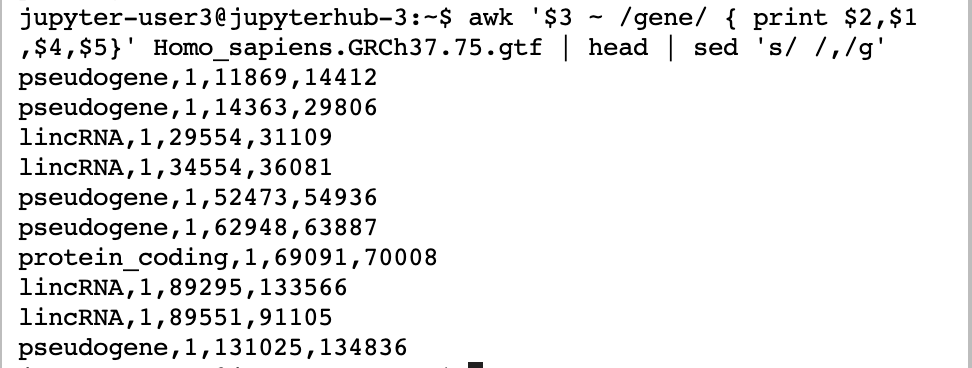
Let’s make it comma delimited.
We could have added commas in awk. However, in this case, we show piping the results into sed. sed is essentially a search and replace tool replacing the space with ,. Remember that we are piping into head to just get a preview. sed is based on regular expressions, another term for complex matching and substitution. sed generally works as s/find/replace/g. It becomes quite amazing how complex these can be. Please go to http://regex101.com to learn about how to make complex matches.
awk '$3 ~ /gene/ { print $2,$1,$4,$5}' Homo_sapiens.GRCh37.75.gtf | head | sed 's/ /,/g'
Redirecting into a file
We actually haven’t written any files yet. We are essentially running programs and then piping to head which prints only the first 5 lines or so. This provides us with a preview of what the multiple commands together are doing. This time lets actually put the information into a file by using the redirect or > into the file gene_dist.csv
awk '$3 ~ /gene/ { print $2,$1,$4,$5}' Homo_sapiens.GRCh37.75.gtf | sed 's/ /,/g' > gene_dist.csv
Give it a first-line header line
For later steps, we really need a first line that tells us what our columns are. By convention, csv files have headers. We have decided to use sed for that as it also allows us to insert lines. Now, to be clear – I didn’t remember that at first, but upon googling, I found out how to do that functionality of sed. That is an important aspect that one does not need to remember every feature of every command.
sed -e "1ifeature,chr,start,end" gene_dist.csv > gene_dist_head.csv
To get started we will go back to our directory.
ls -l
Ouput:
![]()
We see our previous files, their permissions, and their size.
Finally, let’s look at our new file using the less function.
less gene_dist_head.csv
Output:

We can see a header at the top, followed by the data we were looking for!